Setting up an AQUARIUS Data Feed
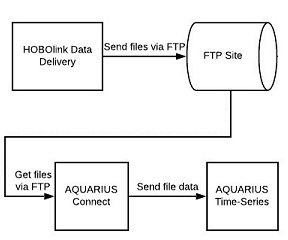
The following diagram is an overview of how data from HOBOlink can feed into an AQUARIUS Time-Series via AQUARIUS Connect.
Before You Begin
To set up this data feed, you must first do the following:
- Create and run an export with Text (.csv) as the selected file format and all of the sensors selected that you want to include in the data feed. See Exporting Data for details. You will need to reference the exported .csv file when setting up AQUARIUS Connect.
- Set up a data delivery schedule using the export created in the previous step and select FTP as the data destination. See Scheduling Data Delivery for details. This data feed requires an FTP site to receive regularly delivered HOBOlink files. Make sure at least one file has been delivered to the FTP site to test AQUARIUS Connect and that AQUARIUS Connect has access to the FTP site.
- Make sure you have AQUARIUS Time-Series admin credentials.
- Set up an AQUARIUS Time-Series and create the desired Time-Series Location. Refer to the AQUARIUS Time-Series documentation for details. If any parameters or units were added or modified to the AQUARIUS Time-Series, you will need those items as well.
Setting up AQUARIUS Connect
Follow these steps for setting up AQUARIUS Connect and then testing the data feed. Make sure all the steps described in Before You Begin have been completed first.
Step 1: Create a Location.
- Click Locations in the left menu.
- Click +Create Location.
- Populate the fields as follows:
- Set the Identifier to the Location Identifier from AQUARIUS Time-Series.
- For Name, enter an identifiable name.
- Set Time Zone to the time zone of Location in AQUARIUS Time-Series.
- For Description, describe the location if desired.
- Click Save in the upper right. Note: If you have more than one location, repeat these steps.
Step 2: Create a Connector.
- Click Connectors in the left menu.
- Click +Create Connector.
- For Name, enter an identifiable name.
- For Description, enter details if desired.
- Click Single Location. Note: You can also use Multi-Location if you are using more than one location.
- Click the Location row and select the location created in Step 1 from the drop-down list.
- Set the drivers and rules as follows:
- Click the Extraction Driver rule and select CSV Extraction Driver from the drop-down list.
- Click the Inbound Connection Driver row and select the FTP Inbound Connection Driver from the drop-down list.
- Under Extraction Rule, complete the following:
- Set Header Row to 1.
- Set First Data Row to 2.
- Set Date Column to 2.
- Set Date Column Format to MM/dd/yy HH:mm:ss.
- Under Inbound Connection Rule, complete the following:
- Set the FTP Server to the FTP server name used for data delivery.
- Set the User Name to the FTP server user name.
- Set the Password to the FTP server password.
- Set the Source Path to the path on the FTP server where the exported HOBOlink files are delivered followed by /*.csv (i.e. <path to files>/*.csv).
- Click Save in the upper right to save the connector.
Step 3: Create Connector Data Set Rules.
Note: Steps 3 through 7 in this section must be repeated for each sensor that is included in the exported .csv file.
- Click Connectors in the left menu.
- Click the connector created in Step 2.
- Click +Add Data Set Rule near the bottom.
- Referring to the exported .csv file, set the Data Set Identifier to the column number of the data to load. For example, if the sensor data is in the third column of the .csv file, then set the Data Set Identified to 3.
- Enter the name of the Data Set under Display Name. This will be saved in AQUARIUS Connect.
- Add an Export Target.
- Click + Add Export Target.
- Enter the name of the Export Target under Display Name. This will be saved in AQUARIUS Connect.
- Click Export Driver and select AQUARIUS Time-Series Export Driver from the drop-down list.
- Expand Export Rule.
- Expand Aquarius Time-Series Authentication.
- Set AQUARIUS Time-Series Username to the admin username of the AQUARIUS Time-Series instance.
- Set AQUARIUS Time-Series Password to the admin password of the AQUARIUS Time-Series instance.
- Set the Parameter Identifier based on the measurement type of the data being loaded. Use the following table for reference.
 Parameter Identifier Table
Measurement Type Identifier Water Temperature Water Temp Air Temperature Air Temp Internal Temperature Internal Temp Atmospheric Pressure Atmos Pres
Relative Humidity Rel Humidity Precipitation Incremental Precip Increm
Evapotranspiration Amount Evapotrans Total Incoming Solar Radiation Solar Rad Wind Direction Wind Dir Wind Speed Wind Vel Wind Gust Speed Wind Gust Vel Depth Depth Voltage Voltage Photosynthetically Active Radiation PAR pH pH Water Level Water Level Note: There are many other parameters available. If the one you require is not listed, consult your AQUARIUS Time-Series instance.
- Enter the desired label of the new Time-Series under Time-Series Label. This will be saved in AQUARIUS Time-Series.
- Expand Time-Series Creation.
- Uncheck Inherit from Profile next to Time-Series Creation Mode.
Set Time-Series Creation Mode to Create Basic Time-Series.
- Set Interpolation Type for the new time-series to Type 1.
- Set Unit for New Time-Series based on the data being loaded. Use the following table for reference.Units Table
Unit Name Unit Identifier Fahrenheit degF Celsius degC Pound per Square Inch psi Pascal
Pa Kilopascal kPa Inch
in Millimeter mm Foot ft Meter m Radian rad Degree deg Mile per hour mph Meter per second m/s pH Unit pH Units Volt V Millivolt mV Note: If the unit you require is not listed, consult your AQUARIUS TIme-Series instance.
- Expand Outbound Connection Rule.
- Set Address to the URL of the AQUARIUS Time-Series instance.
- Click Save in the upper right to save the data set rule.
- Repeat 3 through 7 for each column of data in the .csv file to be loaded into the connector.
Step 4: Test the Connector.
- Click Connectors in the left menu.
- Click the connector created in Step 2.
- Click Run Connector in the upper right.
- Check AQUARIUS Time-Series to ensure the Time-Series and data points are added. Note: Connectors may take a few minutes to run.
- If data is present, then the test is complete. Continue to Step 5 to create a schedule.
If data is not present, click Event Log in the upper right. If the most recent line is marked as "Processing," then wait a few minutes and click Refresh. if the most recent line is marked as "Error," then double-check that the data set rules were configured correctly.
Step 5: Create a Schedule.
Note: The schedule you create in AQUARIUS depends on the data delivery schedule set in HOBOlink. The following steps assume exported files are being delivered to the FTP site every 30 minutes.
- Click Schedules in the left menu.
- Click +Create Schedule.
- Set the Name to something identiable.
- Enter a Description if desired.
- Click Enabled.
- Click +Add Trigger.
- Click Never and set to Daily.
- Set Step to 00:30 (substituting for 30 the interval of your data delivery schedule).
- Set From Time to 00:00.
- Set To Time to 23:59.
- Click Save in the upper right to save the schedule.
Step 6: Assign the Schedule to the Connector.
- Click Connectors in the left menu.
- Click the connector created in Step 2.
- Click Edit Connector in the upper right.
- Click Schedule.
- Select the schedule created in Step 5.
- Click Save in the upper right.
Once the schedule is assigned to the connector, AQUARIUS Connect will follow that schedule to retrieve the data delivery files on the FTP site and add the data from them into AQUARIUS Time-Series.
Important: AQUARIUS Connect currently cannot clean up files from an FTP site and will therefore process all files present every time it runs. It is recommended that you periodically remove old files from the FTP site to reduce the processing required by AQUARIUS Connect.